This chapter contains the following topics:
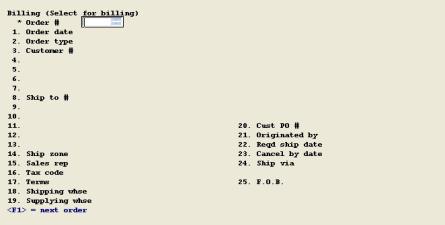
Use this program to select regular orders (Type O) for billing and to enter or modify order data, such as Date Shipped or line item Quantity To Ship, before invoice printing and posting. Orders that were entered as Invoices or Credit Memos (Type I or Type C) cannot be selected by this program, since those order types are automatically selected for billing at the time of entry.
Select
Billing from the Select for billing menu.
The program prompts you to enter the Order Number of the order you wish to bill. Enter a number, or press <F1> to search for the next unselected regular order on file until you find the right order. If you enter an Order Number which is an Invoice or Credit Memo, the warning "Invoice or credit memo cannot be selected - Press ENTER to continue" will be displayed.
If you answer Y to "Right order", the program checks to see if the order has already been selected or invoiced (the invoice printed but not posted). If the order has already been selected, the question "Order is already selected - want to reselect ?" will be displayed. Enter Y to reselect or N to return to the Order Number entry position. If the order has already been invoiced, the question "Order is invoiced - want to reselect ?" will display. Enter Y to reselect, or N to return to the Order Number position.
Revise this entry or change other fields on the order header screen. Refer to Chapter Sales Orders, for the data entry formats of these fields. You are not, however, allowed to change Order Type or Customer Number. You are also not allowed to change Shipping Warehouse, Supplying Warehouse, Requested Ship Date, Cancel by Date. If you use Commission splits, you are not allowed to change Salesman Number.
After you have completed making changes on the first order screen, you are given three options for billing of this order. You may select:
| 1. | Bill all lines: to bill all open lines as they are currently on the order |
| 2. | Bill selected lines |
| 3. | Bill all lines except |
Choices 2 and 3 will move you into the line item screen where you may be selective about the lines and quantities which will be billed. For "2. Bill selected lines", all lines in the order will be "Not selected" and you must select the lines you wish to bill. For "3. Bill all lines except", the opposite is true; all lines are automatically set to "Selected", and you will need to call up the lines that you do not want to select, or for which you need to change the Quantity to Ship or the Open/Closed status.
If you select "1. Bill all lines" or "3. Bill all lines except", closed line items with no shipments (line items which you previously forced to Closed Status and for which you entered a Closed Code) will also be automatically selected for printing on the invoice with their Closed Codes if the Order Number being selected does not a have a Backorder Number suffix.
If you choose "1. Bill all lines", the program will go directly to the summary screen.
If you choose options 2 or 3, the program will then go to the line item screen where you are prompted to enter Line Number, or press <F1> until you find the Line Number you want. The program will ask "Field number to change ?". You may update fields 9 thru 19, (Quantity to Ship, Quantity from Stock, Quantity from WIP, etc), using the data entry formats described in Chapter 8.
After you have completed any changes to the record and If C/O Control Information indicates you use Order Line Comments, you may add or change Line Comments for the Invoice.
If Lot or Serial Number control applies to a line item selected for billing, you are prompted to enter detail quantity distributions on a subsequent screen. This additional information is later written to Lot/Serial Number History when invoices are posted.
Lot/Serial Number Distributions
The Lot/Serial Number distribution screen displays the Item Number and Description, Stock Quantity To Ship (or Returned), Stock Quantity (remaining) To Distribute, WIP Quantity To Ship (or Returned), and WIP Quantity (remaining) To Distribute. Previous Lot or Serial Number quantity distributions, if any, are also displayed on the bottom section of this entry screen. You must enter detail quantity distributions (to Lot or Serial Numbers) until Stock Quantity To Distribute and WIP Quantity To Distribute are both zero. Then press ESC (or TAB) to exit this screen.
The Lot/Serial Number quantity distribution fields you enter are:
1. Lot # (or Serial #)
Entry Format: Up to 15 alphanumeric characters, or
Blank = "Undefined", or
<F2> = "display on-hand detail".
For Lot Number, the entry consists of the following 3 segments:
| • | Lot/S.O. # Shop Order Number; up to 6 alphanumeric characters. Spaces not allowed. |
| • | Lot/Rls # S.O. Release Number, up to 2 numeric digits or space. |
| • | Lot/User The program reformats the S.O. # and Release # entries, and adds a "*" character. After the "*", you may add more User assigned identifiers to the Lot Number, or press ENTER to continue. |
Validation For Lot Numbers only
If the Shop Order and Release Number portions of the Lot Number entry do not match an open or closed Shop Order on file for the Item Number, the program warns you about this mismatch but provides the option to proceed.
Comment: If you are distributing a stock quantity and press <F2> to display on-hand detail, you may select the Lot or Serial Number by entering the related 3 digit Sequence Number in the on-hand detail window displayed by the program.
2. Stock or WIP
Entry Format: S = Stock, or W = WIP.
Comment: Indicates whether you are distributing the Stock Quantity or WIP Quantity To Ship (or Returned). A default displays if the remaining quantity is not split between Stock and WIP.
3. Quantity
Entry Format: Up to 8 whole number digits plus 3 decimals, or zero.
Default: For a Serial # control item, 1 is the default. For a Lot # control item, remaining Quantity To Distribute for the designated Stock or WIP category is displayed as the default. Press <F1> if you wish to change the default quantity.
Comments: If the Lot # or Serial # entry matches a displayed previous distribution, this quantity will replace (not add to) the previously entered quantity. A zero quantity entry will therefore delete a previously entered distribution for the same Lot or Serial Number.
4. Reference
Entry Format: Up to 25 alphanumeric characters.
Default: The bill to Customer Name is displayed as the default entry.
Field number to change ?
Use "Field number to change ?" to modify entries, or press ENTER at that position to post the detail quantity distribution. The program deducts the distribution Quantity from the Stock Quantity To Distribute or WIP Quantity to Distribute. The new balances are then redisplayed, and the cursor returns to the Lot or Serial Number position. When both Quantity To Distribute fields are reduced to zero, you may press ESC (or TAB) at the top entry position to exit the screen. Otherwise, continue entering additional quantity distributions until both Quantity To Distribute fields are zero.
When you have finished selecting line items for billing, press ESC (or TAB) at the Line Number entry position. If in A/R Customers it specifies that the customer does not accept backorders, the program asks if it is OK to close unselected lines and delete the order after billing. Answer Y to confirm the "No backorder" rule, or N to override that procedure for the order.
The order summary screen then displays, and you are prompted to enter or to confirm the Freight amount. However, if the order F.O.B. was entered as "Free freight", then you will not be allowed to enter or change the value of Freight.
If Certifications are used, you may change the fields 13. Cert reqd ? and Cert # before you print Certifications.
If you are using the Ship Labels option for this package, you are prompted to enter:
14. No. of ship labels Enter up to 2 numeric digits or zero.
If I/M Control Information indicates you use Multiple Stock Locations and some line items will be Shipped From Stock (or Returned To Stock), you are prompted to enter:
15. Ship from stock locn code, or
Return to stock locn code
Entry Format: Up to 5 alphanumeric characters, or
Blank = "Undefined".
Comments: All line item quantities shipped from stock will be disbursed from this one location, or all credit quantities returned to stock will be returned to this location, when invoices are posted by another program. You may use "Relocate items" on the menu for "Inventory transactions" to move the items to or from this location.
This report shows checkbook entries in order by date, along with a running balance.
Select
Cancel selections from the Billing menu.
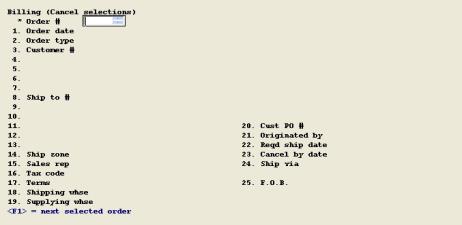
Use this choice to cancel previous selections of regular Orders (Type O) for billing. This program changes the order billing status to "unselected", and keeps the order on file for future selection.
You may only cancel billing selections of regular orders (Type O). Invoice and Credit Memo orders (Types I and C) remain selected until they are invoiced and posted by other programs in this function or are deleted in the Sales Orders, Enter program.
The program prompts you to enter the Order Number of the order you wish to cancel billing selection. Enter a number, or press <F1> to search for the next selected regular order on file until you find the right order. After the header information of a selected order is displayed, the program asks: "Cancel selection of this order ?" Answer Y to unselect the order from billing, or N to keep the order selected. The cursor will then return to the Order Number position, where you may continue to cancel billing selection of more orders, or press ESC (or TAB) to exit.
Only orders selected for billing will be printed. You may use this report to recheck the accuracy of billing data before you print the Standard Certifications, Shipping Labels, and Invoices. Grand total dollar amounts for all of the billable orders listed are also printed.
Select
Billing edit list from the Billing menu.
The following screen displays:
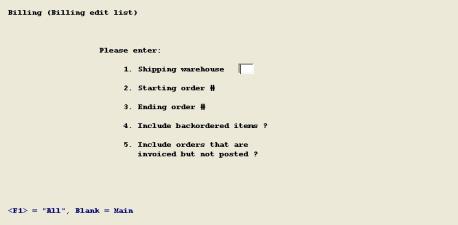
Enter the information as follows:
1. Shipping warehouse
Up to 2 alphanumeric characters.
<F1> = "All."
2. Starting order #
Up to 6 numeric digits.
<F1> = "All" billable orders.
3. Ending order #
Up to 6 numeric digits.
Blank = Starting value.
4. Include backordered items ?
Y or N.
5. Include orders that are invoiced but not posted ?
Y or N.
Use this program to print Certifications for all orders selected for invoice printing that have a Y answer to the "Cert Required ?" question, or for a selected Order Number that you specify.
Select
Certifications from the Billing menu.
The following screen displays:
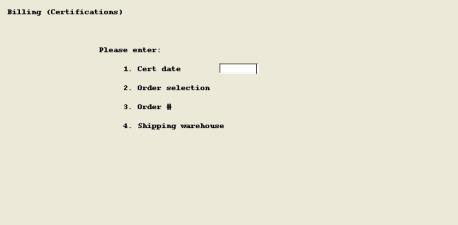
Enter the information as follows:
1. Cert date
Enter 6 numeric digits in MMDDYY format, the System Date is the displayed default.
2. Order selection
S = Selected orders to invoice
U = User specified order #
3. Order #
Up to 6 numeric digits.
(Not applicable if Order selection is S.)
4. Shipping warehouse
Up to 2 alphanumeric characters.
<F1> = "All".
(Not applicable if Order Selection is S.)
If you choose the all "Selected orders to invoice" option, this will not include orders for which invoices are already printed.
Certifications may be printed for any specific order needing a certification by choosing "User Specified Order Number". If the order is not selected you are asked if you want to print the open line descriptions only - this means shipping quantities will not be printed and may later be written on the certification.
When you have completed your entries and any changes, the program asks "Forms mounted on printer ?". When you answer Y, you are asked if you wish to "Print alignment ?". Answer Y to print a sample form for alignment purposes, or answer N to print the certifications.
Use this program to print Shipping Labels for all orders that are selected for invoice printing, or for an Order Number range that you specify that are not Credit Memos.
Select
Shipping labels from the Billing menu.
The following screen displays:
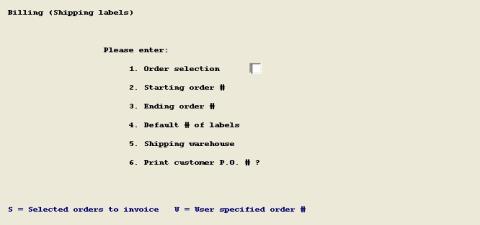
Enter the information as follows:
1. Order selection
S = Selected orders to invoice
U = User specified order number
2. Starting order #
Up to 6 numeric digits.
(Not applicable if Order selection is S.)
3. Ending order #
Up to 6 numeric digits. Blank = Starting value.
(Not applicable if Order selection is S.)
4. Default # of labels
Up to 2 numeric digits.
If the number of labels is not specified in the Order record, this number of labels will be printed.
(Not applicable if Order selection is S.)
5. Shipping warehouse
Up to 2 alphanumeric characters. <F1> = "All".
(Not applicable if Order Selection is S.)
6. Print customer P.O. # ?
Y or N, with a default of Y.
If you choose the all "Selected orders to invoice" option, this will not include orders for which invoices are already printed. With the "S" option the number of labels to be printed for an order was specified when you selected the order for billing. Labels may be printed for any other order that is still open by choosing the "User Specified Order Number" option and then typing in the Number of Labels wanted. Labels are not printed for Credit Memos (Order Type C).
When you have completed your entries and any changes, the program asks "Forms mounted on printer ?". When you answer Y, you are asked if you wish to "Print alignment ?". Answer Y to print a sample form for alignment purposes, or answer N to print the labels.
Invoice printing includes those orders initially entered as Credit Memos (Order Type C) or Invoices (Order Type I), and regular Orders (Order Type O) that you have selected for billing.
Invoices may be printed on preprinted forms or plain paper, depending on the setting in Control information.
Select
Print invoices from the Billing menu.
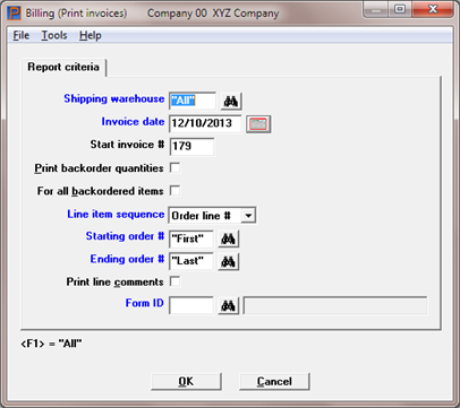
In graphical mode the following screen displays:
Character Mode

Enter the information as follows:
Up to 2 alphanumeric characters. <F1> = "All".
6 numeric digits in MMDDYY format. The System Date is the default displayed.
Press ENTER to accept the Control information default displayed, or enter another value. You should normally use the Control information value to prevent duplicate invoice numbers being assigned.
Y or N, with a default of Y. A N answer means that no backorder quantities will print on invoices. If you answer Y, the program asks:
Y or N, with a default of Y. A Y answer to this question means that backorder quantities will print for billed and unbilled lines. N means backorder quantities will print for billed lines only.
Using graphical mode select either Order line # or Item #.
Using character mode select O for order line number, or I for item number.
Up to 6 numeric digits. <F1> = "All selected" orders.
Up to 6 numeric digits. Blank = Starting value.
This field can only be entered if C/O Control information indicates line comments are used.
If using a custom format, enter the form ID. To enter a new custom invoice format see the Forms chapter.
Graphical Mode Printing
Select OK to proceed to the next screen. Select Cancel to return Customer Orders menu.
After you select OK you will be asked to select a printer. After selecting a printer the following screen displays:
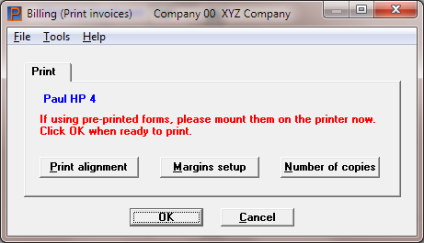
Select this button to print a test alignment form filled out with X's and 9's. Alignments may be used if you are printing to one of the following:
| • | Company information laser printer |
| • | Company information -PDF- or -PDFP- printer |
| • | Windows printer |
Alignments to a Company information non-laser printer, like dot matrix, is done manually.
If you have aligned the form in the past the default alignment settings are recalled from the last time done. You should only generate an alignment if the form has changed, the printer has changed or the driver on your computer has changed.
If you select a Company information -PDF- printer, the program displays the alignment image as long as Adobe Acrobat or Adobe Reader is installed on your system. You may also view the alignment again from the CTL menu selection Email/view printed PDF's, located under the main menu selection PDF form file processing.
If after printing an alignment, you may find you need to change the alignment settings. Select this button to change the up/down and right/left adjustment.
To change the alignment for a Company information printer enter a negative or positive number for the Default top margin and Default left margin. To change the alignment for Windows printer enter a number greater than the Default top margin or the Default left margin as the case may be. Negative numbers are not allowed for Windows printer.
By default you will print one copy. If you need to print more than one, select this button. You may also enter a label for each copy. The label prints near the bottom of the page.
Select OK to print the invoices. Select Cancel to return to the invoice selecting screen.
Character Mode Printing
When you have completed your entries and any changes, the program instructs: "Mount forms on printer & type DONE when ready". When you answer DONE, the program asks "Print alignment ?". Answer Y to print alignment characters on one form, or answer N to print the Invoices. After Invoices are printed, you are asked "Invoices printed OK ?". If you answer Y, the program internally marks those orders as invoiced and ready for posting and then returns you to the preceding menu. If you respond N to the printed OK question, indicating the invoices are not ready for posting, you are given the option to reprint Invoices immediately or exit to the menu.
This program posts data from orders which have been successfully invoiced to various files/tables including A/R Open Items and A/R Commissions Due, Customers, Sales Reps and Tax Codes, the Item Master records and Branch Warehouse Item records, Inventory Transaction History, and Detail Sales History. The Sales Journal is automatically printed for the new receivables.
When invoices are posted, the quantity shipped to date is updated in order line item records. If all line items have "Close after billing ?" set to Y or were previously closed, the order header record is deleted. Regular orders with remaining open line items stay on file as backorders; the backorder number in the order header record is incremented and the "Print Packing List ?" answer is reset to Y to generate a new list the next time Packing Lists are printed. Closed order line items remain on file as history until you purge them with another program.
If you use PBS Manufacturing Job Costing, invoice amounts will also post to jobs with a sales order number in the job master that matches the order number being billed.
Select
Post invoices from the Billing menu.
The following screen displays:

Enter the information as follows:
Are invoices OK to post ?
Answer Y to post the invoice data and print the Sales Journal, or answer N to exit the program without posting. If the entry is Y, the data you enter are:
1. Shipping warehouse
Up to 2 alphanumeric characters. <F1> = "All".
2. Your initials
Up to 3 alphanumeric characters.
From Field number to change ? select Enter and you will be asked to select a printer. Select <Esc> and you will be asked to re-enter the screen.